How to install teamcity on centos 7
TeamCity is a Java-based build management and continuous integration server from JetBrains. It was first released on October 2, 2006. TeamCity is commercial software and licensed under a proprietary license. A Freemium license for up to 20 build configurations and 3 free Build Agent licenses is available. Open Source projects can request a free license.
Source: Wikipedia
Prerequisites
- Centos 7 must be installed
- Java must be installed
- Postgresql should be installed or use this link to install postgresql
Read Next: How to install teamcity agent on centos 7
Download TeamCity
Firstly we will download the TeamCity tar archive from the official website.
wget https://download.jetbrains.com/teamcity/TeamCity-2017.1.3.tar.gz
tar xvf TeamCity-2017.1.3.tar.gz
Read Also: How to install postgresql 9.6 on centos 7
Install TeamCity
Now we will install TeamCity.
mkdir /opt/teamcity

mv TeamCity /opt/teamcity
Download PostgreSQL JDBC driver
We need to download PostgreSQL JDBC driver in order to use PostgreSQL database for TeamCity. You can download it from this link also or use the following command to download via yum.
mkdir -p /opt/teamcity/TeamCity/.BuildServer/lib/jdbc/
wget https://jdbc.postgresql.org/download/postgresql-42.1.4.jar -P /opt/teamcity/TeamCity/.BuildServer/lib/jdbc/
We will create a startup script to start teamcity. Create a new file in /etc/systemd/system/teamcity.service.
vim /etc/systemd/system/teamcity.service
[Unit]
Description=TeamCity Server
After=network.target

[Service]
Type=forking
PIDFile=/opt/teamcity/TeamCity/logs/teamcity-server.pid
; Make sure the CATALINA_PID env variable is setup in $TEAMCITY_HOME/bin/catalina.sh
ExecStart=/opt/teamcity/TeamCity/bin/teamcity-server.sh start
ExecStop=/opt/teamcity/TeamCity/bin/teamcity-server.sh stop

[Install]
WantedBy=multi-user.target
Enable and Start TeamCity Services
Now we will enable and start TeamCity using systemctl. Before we need to reload the daemon because we have created new service file.
systemctl enable teamcity
systemctl start teamcity
Configure postgresql
Open /var/lib/pgsql/9.6/data/pg_hba.conf in your favourite editor and replace ident by md5.
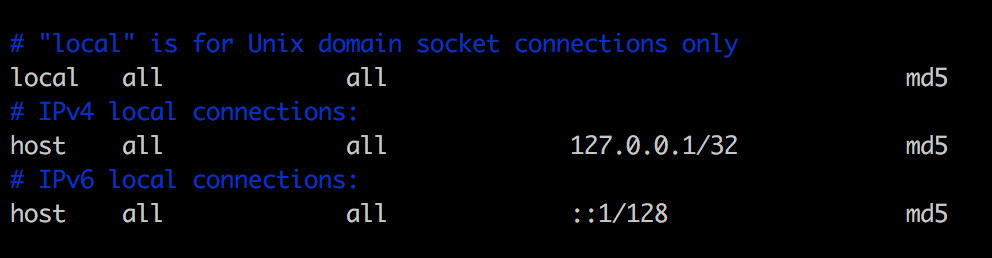
systemctl restart postgresql-9.6
Create user and database in PostgreSQL
Now we will create a user in PostgreSQL database for TeamCity.
[root@installvirtual ~]# psql -U postgres
Password for user postgres:
psql (9.6.3)
Type "help" for help.

postgres=# CREATE USER teamcity WITH PASSWORD 'teamcity';
CREATE ROLE
postgres=# CREATE DATABASE teamcity OWNER teamcity;
CREATE DATABASE
postgres=# \q
Now we have created a user in PostgreSQL let’s go to the TeamCity web interface and continue installation.
TeamCity web interface
Now we will go to the web interface to continue our TeamCity installation. Go to ip-address:8111
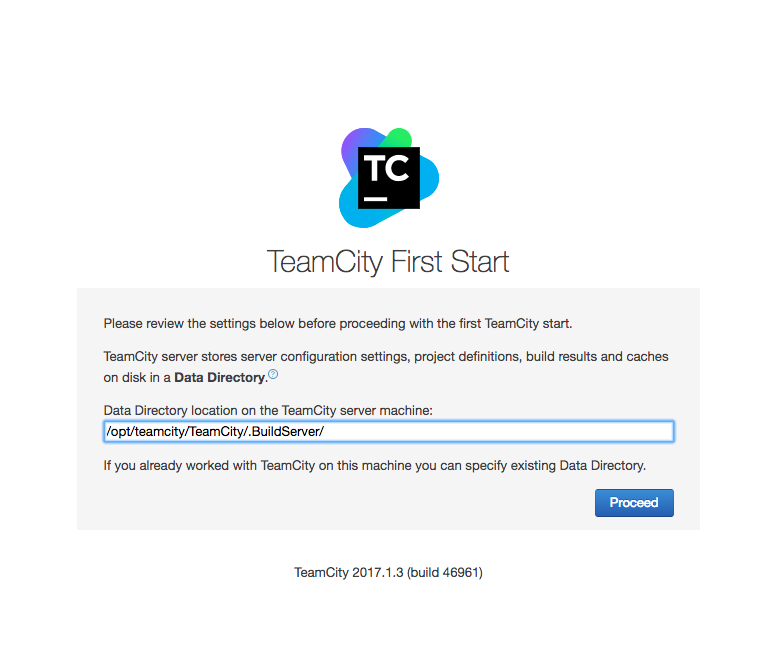
Step 1: Change the Data Directory
Here we will change the data directory to /opt/teamcity/TeamCity/.BuildServer
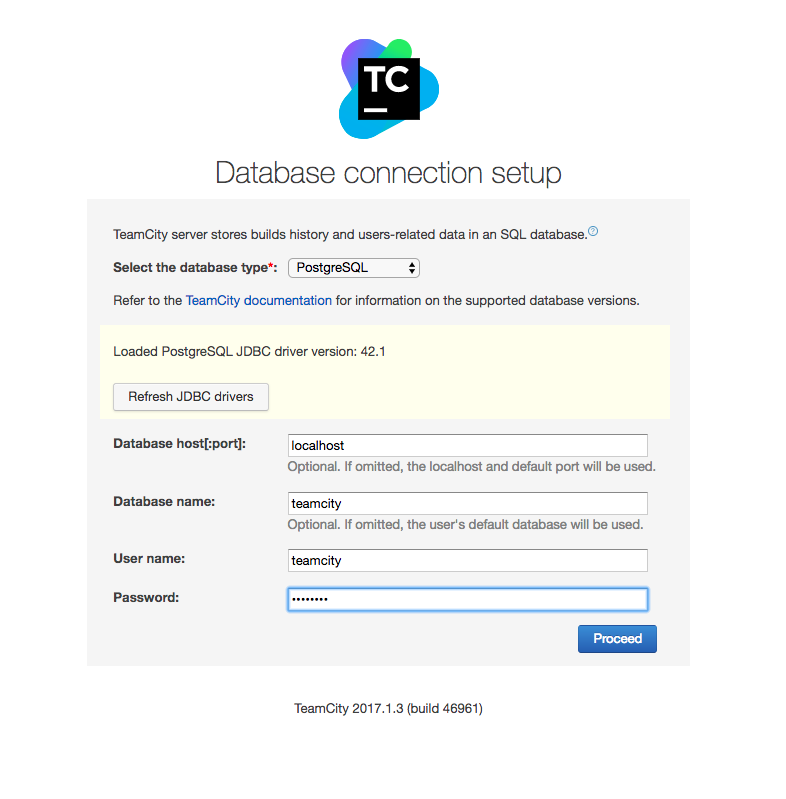
Step 2: Now we have to setup database connection. Select PostgreSQL from the drop down menu and then click refresh to detect the jdbc driver that we have downloaded. Then you need to provide user and password that we have created in PostgreSQL. In my case user is TeamCity and password is also TeamCity.
Step 3: Accept the License Agreement
Now Accept the License Agreement
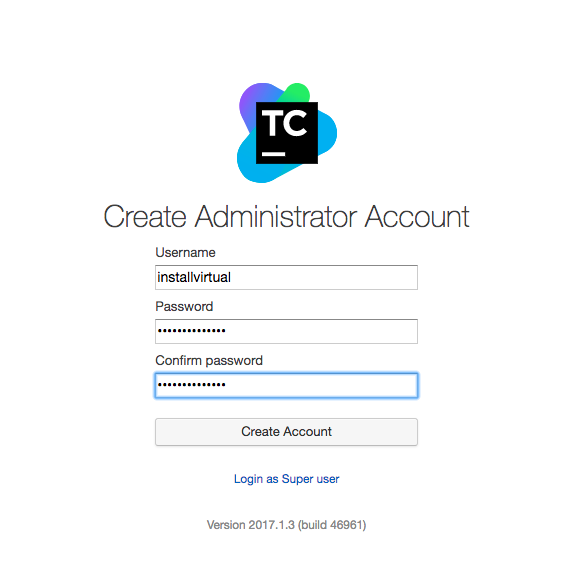
Step 4: Create Administrator Account
Step 5: Put in your name and email address and you are ready to go.
If you got some issues installing TeamCity please feel free to comment below or use this link to ask it in discussions.
Read Also: How to install piwik analytics tools on centos 7
Read Also: How to install piwik analytics tools on Ubuntu 16.04
Leave a Reply